Set up Python
About 20 minutes, before the first Python session.
Do this before the first Python session, at home, on
the laptop you will bring. It takes about 20 minutes, most of it waiting
for downloads. When the last step prints
All good: you are ready for the course. you are done.
You install three things: uv (it fetches Python and the course packages for you), VS Code (where you write and run code) and the course folder. You do not need to install Python yourself, and you do not need Anaconda.
Step 1. Install uv (2 minutes)
Mac: open Terminal (press Cmd+Space, type Terminal), paste this line and press Enter:
curl -LsSf https://astral.sh/uv/install.sh | shWindows: open PowerShell (press the Windows key, type PowerShell), paste this line and press Enter:
powershell -ExecutionPolicy ByPass -c "irm https://astral.sh/uv/install.ps1 | iex"Then close the window and open a new one, then type
uv --version and press Enter. You should see a version
number.
Step 2. Install VS Code (5 minutes)
Download VS Code from code.visualstudio.com and install it. Open it, click the Extensions icon on the left (four squares) and install two extensions, both by Microsoft: Python and Jupyter. Jupyter gives you the Run Cell buttons we use in class. Optional, also by Microsoft: Data Wrangler, which shows a data frame as a sortable table (like Stata’s Data Editor) when you click Variables in the Interactive window and then the table icon beside a data frame. If you skip it, VS Code offers to install it the first time.
Step 3. Get the course folder (1 minute)
Download na446a-starter.zip, unzip it, and
move the folder na446a-starter to your home
folder, the one with your user name. On a Mac: in Finder press
Cmd+Shift+H. On Windows: open File Explorer and type
%USERPROFILE% in the address bar.
Why there: Documents and Desktop are often synced to iCloud or OneDrive, and syncing thousands of small files while Python runs causes strange errors. The course environment is large (about half a gigabyte), so keep it out of the cloud.
Step 4. Install Python and the course packages (5–10 minutes)
In VS Code: File → Open Folder… and choose
na446a-starter (if VS Code asks whether you trust the
authors, click Yes, I trust). Then Terminal → New
Terminal: the line should end in na446a-starter. Type
this and press Enter:
uv syncuv downloads the right Python and the course packages into a hidden
folder .venv inside the course folder. When it is done,
.venv appears in the file list on the left. Nothing else on
your computer changes.
Step 5. Check that everything works (1 minute)
Open scripts/check_setup.py and press the play button
(▷) at the top right. If VS Code asks which Python to use, choose the
one that mentions .venv. Every line should say OK:
Python 3.12 or newer                     OK
Course packages installed                OK
Read a CSV from data/raw                 OK
Save a figure to output/                 OK
Run SQL with DuckDB                      OK
Running inside the project's .venv       OK

All good: you are ready for the course.
The first time you click Run Cell in a lab, VS Code asks which Python to use (it calls it a kernel): choose na446a … .venv. Not in the list? Click the refresh arrow ↻ at its top right.
Working on a lab: how to arrange VS Code
One VS Code window, with the course folder open. The lab and its checker are two tabs in it.
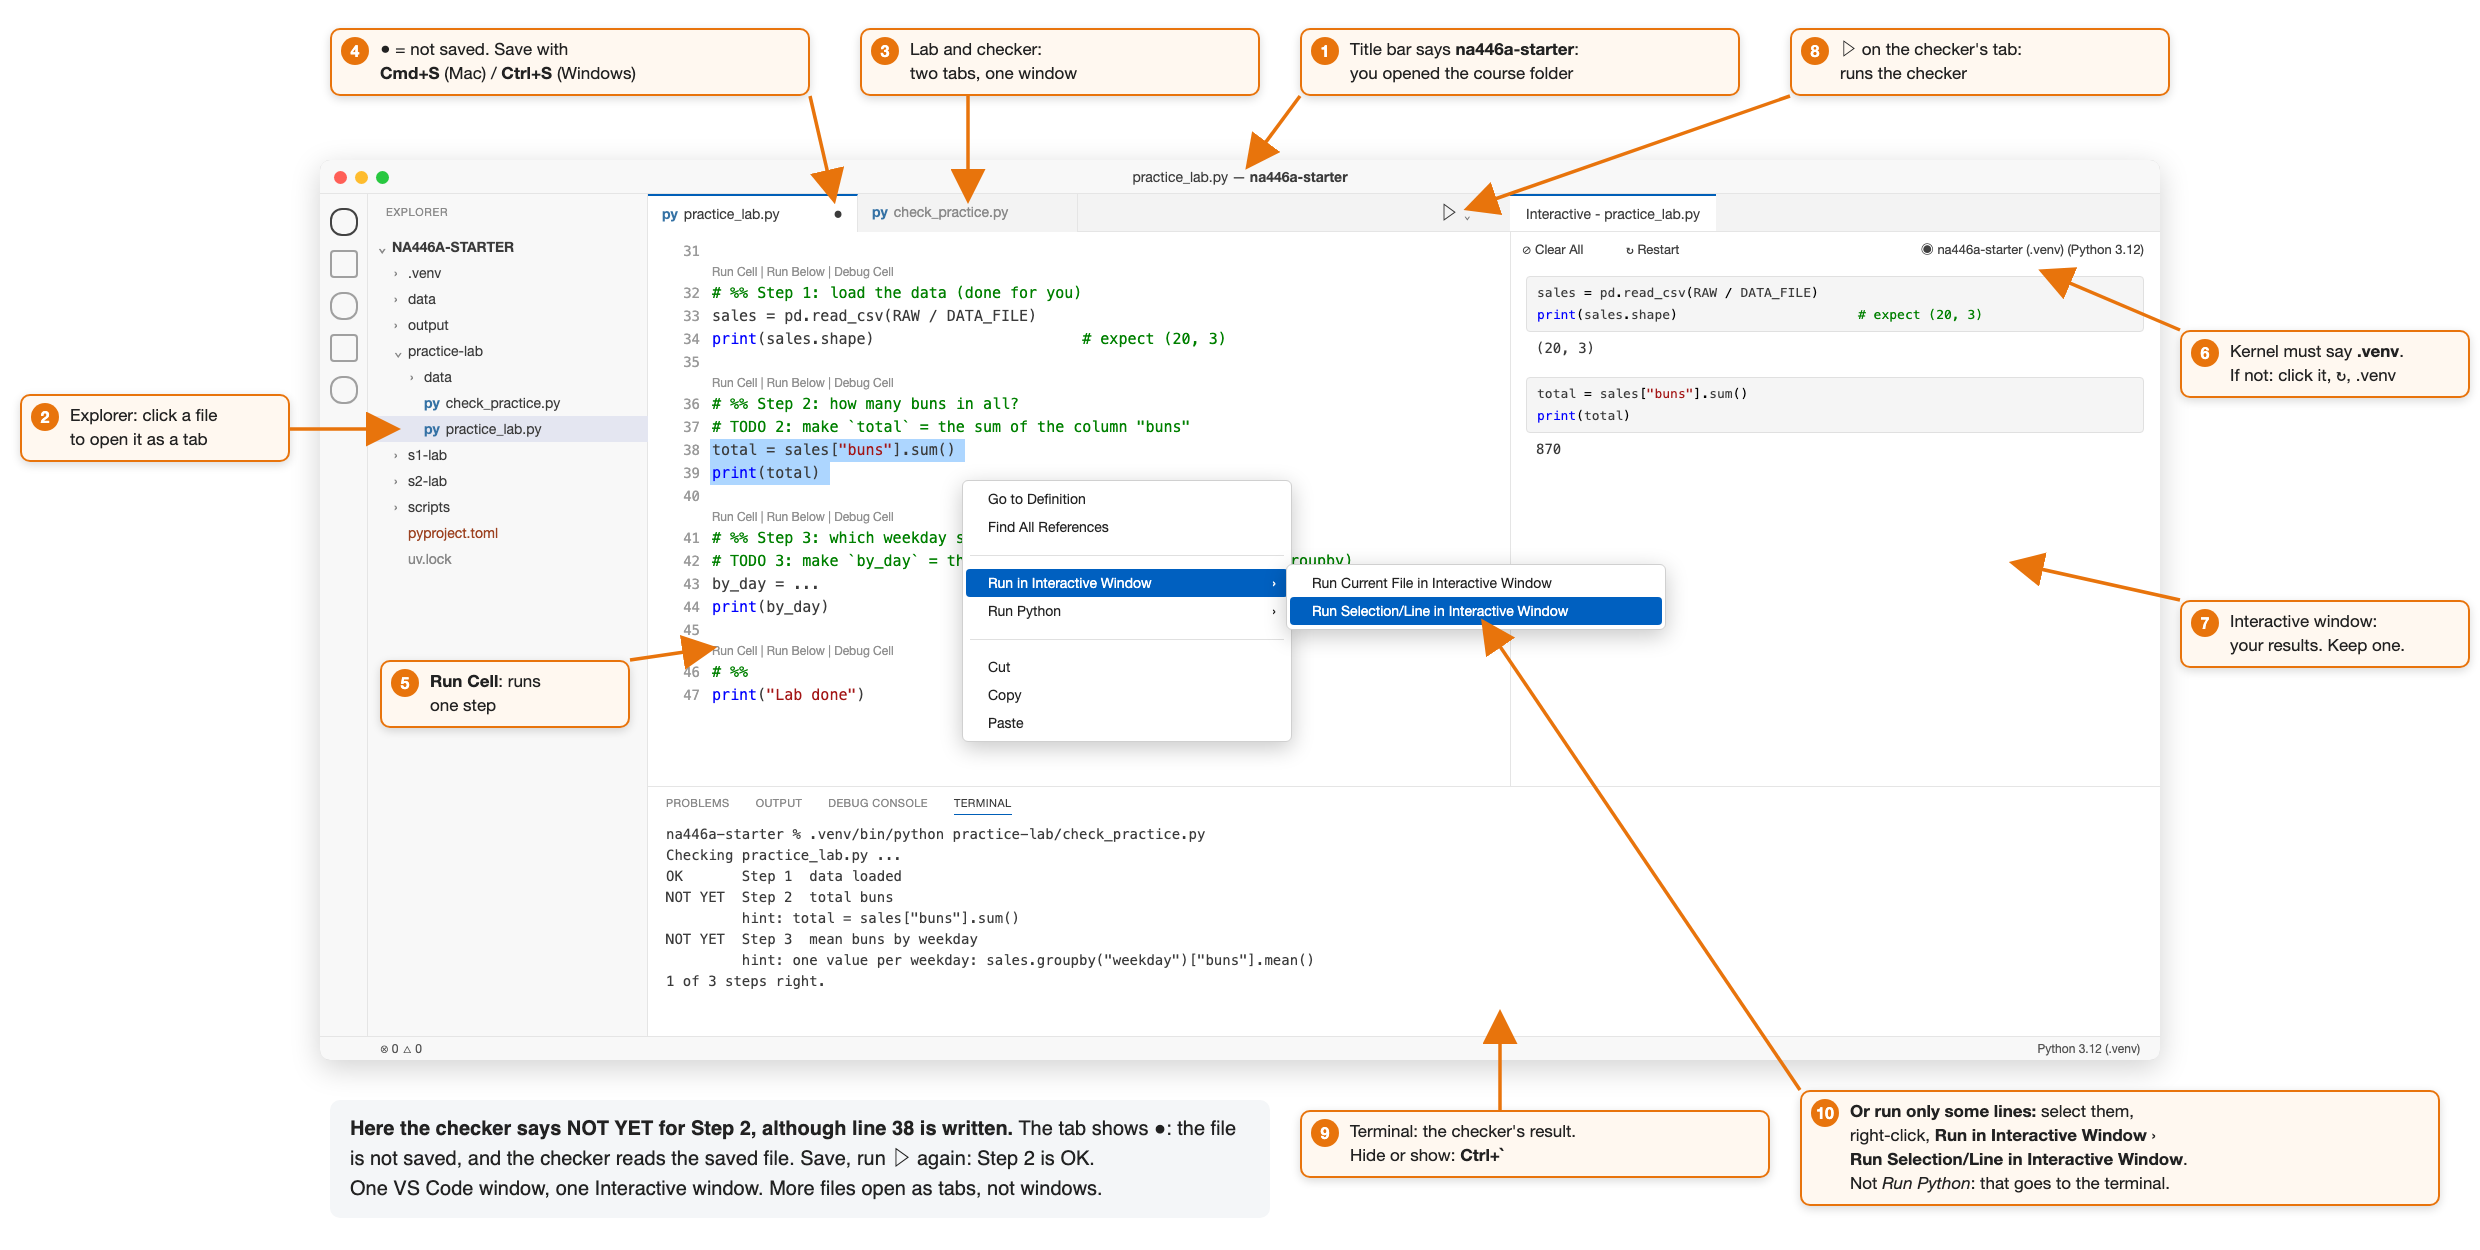
The rhythm, for every step of a lab:
- Write the step in the lab file.
- Run Cell above it, and read the result in the Interactive window on the right. (To run only some lines: select them, right-click, Run in Interactive Window › Run Selection/Line in Interactive Window.)
- Save: Cmd+S (Mac) or Ctrl+S (Windows). The checker reads the saved file. A dot ● on the tab means “not saved”, and then the checker still sees your old version.
- Click the checker’s tab (for example
check_s2.py), press ▷, and read the terminal: OK, or NOT YET with a hint. - Back to the lab’s tab: the next step.
The checker is optional, but it is the quickest way to know you are on track.
Two-minute video of the same rhythm, on a made-up example (no sound):
Try it yourself in five minutes: practice-lab.zip. Unzip it inside
na446a-starter, open
practice-lab/practice_lab.py and follow the rhythm until
the checker says 3 of 3 steps right.
If something fails
uvis not found: you did not open a new terminal after Step 1. Close it, open a new one.- The last check says “not the course environment”:
press Ctrl+Shift+P (Cmd+Shift+P on a Mac), type Python: Select
Interpreter and choose the one with
.venv. - Anything else: email magnus.lodefalk@oru.se with the
subject NA446A setup, and paste three things: what you did,
what you expected, and all the output from
check_setup.py. A screenshot of the error helps too. - Your laptop will not cooperate (work laptop without admin rights, very old machine): email me, and see Plan B below.
Common problems in class
Collected from the sessions; the first two cause most problems.
“Running cells with ‘Python 3.x’ requires the ipykernel
package” (or “No module named ‘pandas’”). VS Code has picked
another Python than the course’s. Do not click
Install. Click Change Kernel (or the Python name at
the top right of the Interactive window), then the refresh arrow ↻ at
the top right of the list, and choose na446a … .venv.
It is often missing from the list until you refresh, because
.venv was made after VS Code opened. Still not there: you
have opened the lab folder on its own (next item).
Always open the course folder. Put every lab folder
you download inside na446a-starter, and open
na446a-starter in VS Code, never a lab folder on its own.
Then the right Python is found by itself.
uv is “not recognized”. The terminal
was opened before uv was installed. Close VS Code completely and open it
again. Still not found: install uv (Step 1), then restart VS Code.
No pyproject.toml found when you run
uv sync. The terminal is in the wrong folder. Open
na446a-starter in VS Code and open a new terminal. On
Windows, check that the folder is not unzipped twice
(na446a-starter\na446a-starter):
pyproject.toml must be directly inside the folder you
open.
Strange file errors, “Access is denied”. The course
folder is in OneDrive, iCloud, Documents or Desktop. Move it to your
home folder (Step 3), delete .venv, run
uv sync again.
Nothing shows on the right. The Interactive window
on the right shows the output of cells: click Run Cell
above a # %% line, or put the cursor in the cell and press
Shift+Enter. To run only some lines on the right: select them,
right-click, Run in Interactive Window › Run Selection/Line
in Interactive Window. Run Python › Run Selection/Line
in Python Terminal sends them to the terminal at the bottom
instead, and ▷ runs the whole file there too: that works, the output is
just at the bottom.
Looking at the data, like Stata’s
browse. Run your cells (so the data exist in the
Interactive window), click View data at the top of that window
(or the Jupyter tab at the bottom, then the table icon next to
the data frame). It opens as a new tab (Data Wrangler) beside your
script, not as a separate window. It does not work for code run with ▷
or Run Selection/Line: that code runs in the terminal.
The Interactive window says “Connecting to …” and nothing runs. The Python behind it has stopped. Click Restart at the top of the Interactive window, choose Restart Kernel, and run your cells again. Still stuck: close all Interactive windows, Ctrl+Shift+P (Cmd+Shift+P on a Mac), Developer: Reload Window. Keep one Interactive window open at a time.
The checker says NOT YET, although you wrote the step. Save first (Cmd+S / Ctrl+S): the checker reads the saved file, and a dot ● on the tab means unsaved changes. Then press ▷ on the checker’s tab again. See Working on a lab.
Too many windows. Keep one VS Code window and one Interactive window. Open other files as tabs (click them in the Explorer), not with File > New Window. Ctrl+` hides or shows the terminal.
uv run check_s3.py: “No such file or
directory”. The terminal starts in na446a-starter,
not in the lab folder. Type cd s3_lab (or
cd s4-lab, the lab’s folder name) once, then the command
again. Or open the file and press ▷: that works from any folder.
NameError: name 'cars' is not defined.
A cell further up has not been run yet. Run the file’s cells from the
top.
Plan B: if your laptop is not ready in time
Come to Session 1 anyway and work with a classmate on their laptop for the lab; the slides show every result, so you lose nothing. Email me before or after the session and we fix your setup before Session 2.
What you just installed, in one paragraph
uv manages Python versions and packages, like
Stata’s ssc install but for the whole project at once.
.venv is the course’s own Python with its
own packages, so the course cannot break other Python on your computer,
and other projects cannot break the course. VS Code is
the editor; the terminal inside it is where you type commands.
You will use the same three pieces in your thesis.